Two Minute Tuesday: Rollups as Search Filters

In this Two Minute Tuesday we’ll be revisiting the topic of Rollup Lists. We’ll look at how you can use a Rollup as a filter when building an advanced search.

In this Two Minute Tuesday we’ll be revisiting the topic of Rollup Lists. We’ll look at how you can use a Rollup as a filter when building an advanced search.

If you have any comments or suggestions for something we can explain in about two minutes, send an email to twominutetuesday@mainsequence.net

Video Transcript

Welcome to this week’s Two Minute Tuesday, Main Sequence’s series of short videos with tips, tricks, and tutorials to make you a more powerful PCRecruiter user.

In an earlier video, we discussed how to put records on a Rollup List. We’re going to revisit rollups in this week’s episode, and talk about how they can be used as a search filter.

Let’s say we’re trying to do some business development in Salem, Oregon, and we have an existing Rollup List of active contacts in the city that we want to exclude from this new project. While the main name, company, and position search screens can perform a basic search of up to three fields combined, to do a search that excludes something requires the ‘advanced’ search. But don’t let the word ‘advanced’ scare you – it’s not as complicated as it might sound.

From the main ‘Company’ search, we’ll click on the ‘Advanced’ option in the navigation menu. Now we’ll build a search query to find the Companies in Salem, Oregon which don’t contain any names from our existing Rollup list of contacts.

Advanced search queries are built from left to right, one line at a time. We’ll start with the City. In the first pulldown, we select a general search area. In this case, we’re going to choose Predefined Fields, because City is a predefined PCRecruiter field. We choose ‘City’ in the second pulldown. In the third pulldown, we choose what sort of match operation we’re doing. The ‘Equal’ operator is the best choice here because we want exact matches for the term we’ll be using. We could also use the ‘Like’ operator if we were doing a partial match. And in the last box we enter our search term: Salem. Now we click ‘Add’ to lock in this line of the query.

Now we can build another line for the ‘State’ criteria, so that we don’t get Salem, Massachusetts or Salem, Ohio and so on. Again, we start on the left with Predefined Field; then choose State; the ‘Equal’ operator; and the value ‘OR’ for Oregon. We click ‘Add’ again.

Lastly, we’re going to use our Rollup list of client contacts as a filter. From the first pulldown, we’ll select ‘Name Rollup’, because we’re going to be filtering the search based on list of name records. When we use a list as a search criteria, the only options are “on list” or “not on list.” We only want to find companies where the names are not on the list. We use the popup arrow to select which list we want to use.

The pulldowns here allow us to set whether each line will be treated as an AND or and OR within the search query. In this case, we only want to find records where all three of the criteria apply, so it will be “AND” all the way down. In other cases, however, you might use these pulldowns to group a few criteria together
 for example, asking the system to find records where the city AND the state match, OR the records are not on the rollup list. The arrows allow you to move the criteria up or down to arrange such groupings.

When the query is built as you wish, you’ll click the search icon in the action menu to run it. If the results aren’t what you had in mind, clicking the ‘Advanced Search’ item in the nav bar will take you back to your search query to refine the criteria and run it again.

For more Two Minute Tuesdays, subscribe to this YouTube channel and watch our social networks or your PCR login screen. If you have any suggestions for future episodes, send an email to twominutetuesday@mainsequence.net.

Two Minute Tuesday: Email Opt-Out

This week’s Two Minute Tuesday video is about PCRecruiter’s email opt-in / opt-out email filter list, which helps you maintain a list of safe email addresses for your bulk mails.

This week’s Two Minute Tuesday video is about PCRecruiter’s email opt-in / opt-out email filter list, which helps you maintain a list of safe email addresses for your bulk mails.

Instructions for this setup are available in the Learning Center.

If you have any comments or suggestions for something we can explain in about two minutes, send an email to twominutetuesday@mainsequence.net

Video Transcript

Welcome to another Two Minute Tuesday, Main Sequence’s series of very short videos with tips, tricks, and tutorials to make you a more powerful PCRecruiter user.

Nobody likes to be on the receiving end of unwanted emails, and depending on where you do business, it may even be illegal to send them. Fortunately, PCR can maintain a list of addresses that have been opted into or out of email sent from your PCRecruiter accounts, and can automatically filter your outgoing emails to comply with that list.

PCR keeps this list in its own separate data table so that any email address that’s been flagged doesn’t receive your email, no matter which of your databases the mail is sent from. The email list is kept independent of your name records so that an email address can remain blocked even if the same address is on multiple contact records, or if you delete the name and re-add it later on.

Let’s set it up.

If no email blocking list has been set up on this account before, we need to tell the system which of our databases it can ‘piggyback’ the new data table onto. We’ll go to the Email Setup area under System and choose “Email Opt-in/Opt-out List”.  Which database we choose to latch the new table onto isn’t that important, but we want to make it’s one we never plan to delete, so we’ll just select the database we use most often and click Save.

We can use the ‘Add Email’ and ‘Import’ options at the bottom of this window to manually add email addresses to this list. Clicking the ‘Add to Rollup’ option searches the database for names which contain emails found on this list and then adds the names to a rollup list for further modification or deletion. And we can come back to this area at any time to search, edit, or export the email addresses

The next step is to configure the wording for your opt in and out links. We’ll go to the Name Letters area under System and click on the configuration icon. The ‘Opt Out Link Text’ is the text of the clickable link as it will appear in your emails
 for example “click here to stop further email communication”. The confirmation text is the message presented to someone after they have successfully opted out
 such as “Thank you. Your email address has been blocked from future emails.”  Similar messaging options appear for the ‘Opt-in’ links. You can set whether people who opt out will be blocked from receiving any emails, or just those emails sent to multiple recipients at once.

The last step is to insert the link into your form letters wherever applicable. You’ll find the opt-in and opt-out links in the Insert Fields list, and they work just like any other mail-merge field. In general, an opt-out link should be accompanied by your mailing address and phone number. Once someone clicks on the link, their email address will be automatically added to the list under the System area.

As always, Main Sequence recommends that PCRecruiter users check with legal counsel or local authorities about how best to comply with the laws for sending email in their area.

For more Two Minute Tuesdays, subscribe to this YouTube channel and watch our social networks or your PCR login screen. If you have any suggestions for future episodes, send an email to twominutetuesday@mainsequence.net.

Two Minute Tuesday: Google Calendar Sync

It’s Tuesday, and that means another Two Minute Tuesday video! This week we’re talking about PCRecruiter’s ability to sync with Google Calendar, which is not only a great way to see and manage all of your scheduled items in one place but also allows you to work with your PCRecruiter Schedule using external software and devices, using Google as the intermediary.

It’s Tuesday, and that means another Two Minute Tuesday video! This week we’re talking about PCRecruiter’s ability to sync with Google Calendar, which is not only a great way to see and manage all of your scheduled items in one place but also allows you to work with your PCRecruiter Schedule using external software and devices, using Google as the intermediary.

Instructions for this setup are available in the Learning Center. Please note that, like many PCRecruiter API integrations, this sync feature may only be available to pcrecruiter.net hosted accounts.

If you have any comments or suggestions for something we can explain in about two minutes, send an email to twominutetuesday@mainsequence.net

Video Transcript

We’re back for another Two Minute Tuesday, Main Sequence’s series of short videos with tips, tricks, and tutorials to make you a more powerful PCRecruiter user.

Today we’re going to look at synchronizing PCRecruiter’s built-in schedule with your Google Calendar. If you use the PCR schedule for your recruiting appointments, but use Google Calendar for everything else, syncing them will let you see, and manage, all of the events in one place. Plus, by syncing your Google Calendar with your mobile device, Outlook, or other calendar management software, you’ll be able to work with your PCRecruiter Schedule using third-party software, with Google as the intermediary.

Before we can sync, we need to make sure that the user account in PCR has the proper security settings. Under System, we’ll select Users, and then Manage Users – if you don’t see these options, log into PCR as an admin, or have an admin user do this step for you. On the user record, we select Security from the sidebar, and then verify that the “Synchronization” option is set to ‘Import, Export’. Clicking Save stores any changes.

Now we can sync with Google. We’ll make sure we’re logged in with the desired PCR user account, and then search for Sync under the System area to get to the Contact/Calendar Sync Settings.

In the popup window, we see a red status indicator, showing that there’s no active connection to Google. We click “Connect” and pick the Google account we want to sync with from the list. We’ll click “Allow” to authorize PCR with access to this Google account. Now the status indicator is green.

Next, we’ll click the Setup option. In the Sync Setup, we’ll pick our time zone, and then select which PCRecruiter Schedules to sync. I have two configured in my PCRecruiter account, but I only want to sync this ‘Personal Meetings’ schedule with Google, so I’ll leave the other unchecked. Clicking “Save” activates the sync.

Now a new ‘Personal Meetings’ calendar will appear in my view on Google, and any changes made at either end will be reflected on the other. If I add an event to my “Personal Meetings” Calendar in Google, it will show up on the schedule in PCR. And if I move that event later in the day in PCR, it will be moved in Google too. Changes are synced roughly every five minutes, but often faster.

The sync only affects this particular calendar, and doesn’t alter or merge with any other Calendars you have in your Google account. We also recommend setting a distinct color for the synced calendar in PCR and in Google so it’s easy to differentiate.

One last note – if you’re still logging into the old PCR 8 web version for some tasks, we recommend that you only edit the schedule from PCR 9 after syncing with Google. Saving events from the PCR 8 calendar, particularly recurring items, can lead to synchronization problems.

For more Two Minute Tuesdays, subscribe to this YouTube channel and watch our social networks or your PCR login screen. If you have any suggestions for future episodes, send an email to twominutetuesday@mainsequence.net.

Two Minute Tuesday: Referrer Field

This week’s Two Minute Tuesday explains the ‘Referrer’ field, which is where PCRecruiter tracks the source of your new candidates as they register via the Web Extensions or your external job postings.

This week’s Two Minute Tuesday explains the ‘Referrer’ field, which is where PCRecruiter tracks the source of your new candidates as they register via the Web Extensions or your external job postings.

If you have any comments or suggestions for something we can explain in about two minutes, send an email to twominutetuesday@mainsequence.net

Video Transcript

We’re back for another Two Minute Tuesday, Main Sequence’s series of short videos with tips, tricks, and tutorials to make you a more powerful PCRecruiter user.

Today we’re going to look at the ‘Referrer’ field, which helps you determine where new names in your database are coming from. The field is automatically populated by the system, so you probably already have data in it, but you might not be aware of it.

On the MyPCR screen, clicking the ‘Web Candidates’ bar searches for people who have recently added their own name to my database via the web extensions. If I click on any name, and then look in the ‘Details’ area, I’ll often find a ‘Referrer’ field with a value in it such as “Indeed,” “LinkedIn.com” etc. This tells me where this person first registered from. How does that data get there?

Well, any time a job link is generated by one of the system’s external posting utilities or job feeds – scenarios in which PCR knows what site or service that apply link is going to be published on – the job link is has a source tag embedded in it. When someone clicks the link and creates a name record, the system records that source tag in the Referrer detail field.

If the candidate just browses their way into your website, or directly loads a job link which wasn’t tagged, then PCR tries to record the last domain name found in the candidate’s browser history prior to reaching the PCRecruiter screen. If there’s no Referrer data, then PCR may simply have been unable to tell where that candidate came from, or the name may not have been self-entered by a candidate.

So
 what if you’re manually sharing a job link on a website or in an email, and you want to control what appears in the referrer field to track the effectiveness of that posting or campaign? Easy. We start by clicking the ‘Add Links’ icon in the editing toolbar on the job record. This popup contains the direct links to this job in our job board. The first two links point to the job description page and, one step further, to the ‘new user’ form for that job. If you use one of these links, PCR will try to guess the referring source based on the browser history. The links at the bottom of this window go to the same screens as the two above, except you can manually alter the source tag. Simply remove the bracketed tag after the equals sign and replace it with the term of your choice when you post it, and PCR will put that value into the Referrer field.

We should point out that Referrer is not the same as EEO Source. Referrer is only collected when a new name is added to the database and doesn’t change if they apply to another job at a later date. Referrer is a record of where this person initially found you. The EEO Source is a self-reported “how did you hear about this job” answer, which the candidate may answer differently each time they apply. Also, if you want to search the Referrer field or add it to your custom layouts or reports and don’t see it as an option, you may need to go to the ‘Name Custom Fields’ area under System to define it first.

For more Two Minute Tuesdays, subscribe to this YouTube channel and watch our social networks or your PCR login screen. If you have any suggestions for future episodes, send an email to twominutetuesday@mainsequence.net.

Two Minute Tuesday: Blinded Resumes

In this week’s Two Minute Tuesday, we’re going to walk through the process of creating a confidential or “blinded” copy of a resume in your system so that it’s safe for sending to third-parties.

In this week’s Two Minute Tuesday, we’re going to walk through the process of creating a confidential or “blinded” copy of a resume in your system so that it’s safe for sending to third-parties.

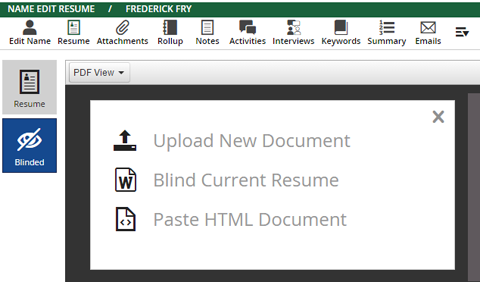
Note: One piece of this video is slightly out of date due to recent updates. Rather than a ‘pencil’ icon when no blinded resume is present, you’ll see the option to upload or paste a blinded resume in addition to blinding the one on file as shown in the video.

Updated "Blinded Resume" Options
Updated “Blinded Resume” Options

If you have any comments or suggestions for something we can explain in about two minutes, send an email to twominutetuesday@mainsequence.net

Video Transcript

We’re back for another Two Minute Tuesday, Main Sequence’s series of short videos with tips, tricks, and tutorials to make you a more powerful user of PCRecruiter.

This week, we’re looking at creating a confidential or ‘blinded’ resume in PCRecruiter, which is a common task to perform before sending a candidate’s information to a potential hiring authority.We’re going to start by quickly parsing a resume into the system as a new candidate record. We’ll click the icon at the upper right, choose ‘Name’, and then choose ‘Parse from Resume’. Clicking ‘Start’ launches the ‘Add Resume’ utility. Now we click ‘Open’ and select a   resume. The system parses the contact info from the resume header, and everything looks good, so we click ‘Save’ to store the new candidate.

Now, we want to create a blinded copy of the document that’s safe for distribution to a client. On the name record, we’ll click ‘Resume’ to view the stored document. The ‘blinded’ option appears in the side bar. At the start, there is no blinded resume and we simply see a blank document. To start creating the confidential version, we mouse into the document and click on the gray pencil.

This will launch whatever appropriate document editing software is installed on my machine – in this case MS Word – with a copy of the resume. Now, we simply go through the document, removing any identifiable information or details.

When all of the necessary edits have been completed, I just close the editing software and save, which causes the system to upload the document back to the PCRecruiter database. Clicking the resume area to reload shows us that the new blind copy has been stored.

Once I have this blinded resume on file, it becomes available as an option whenever I’m sending resumes out of the database. For example, when I select names to email to a hiring contact in the pipeline, the Blinded resume appears as an option in my list of attachable files. When both a complete and blinded copy of the resume are present, PCR will default to selecting the confidential version.

If you get a completely new resume from the candidate at a later date, you may need to update the blinded resume as well. If you don’t want to edit the current blinded resume, you can use the ‘delete’ option in the actions menu to remove the blinded resume from the record, and then repeat the blinding process with the new resume. It’s also worth noting that the original resume on file is the only one that’s used for keyword searches. The blinded resume content is purely for use as a confidential copy to share with third parties, and doesn’t affect the way a record is indexed by PCRecruiter’s internal search engine.

For more Two Minute Tuesdays, subscribe to this YouTube channel and watch our social networks or your PCR login screen. If you have any suggestions for future episodes, send an email to twominutetuesday@mainsequence.net.